| Wiki Markup |
|---|
{style}
.panel {-moz-border-radius: 7px;
border-radius: 7px;}
.panelMacro table {-moz-border-radius: 15px;
border-radius: 15px;}
{style} |
| Panel | ||||
|---|---|---|---|---|
| ||||
This page is intended for developers who want to contribute to Weasis and it is a recommendation for developers who want to create their own plug-ins, see also How to build and install a plug-in. |
...
- Maximum line length is 120 characters (this is a deviation from the Java standards).
- Use spaces instead of tabs.
- Indendation size is 4 spaces.
- Do not insert a new line before opening brace. Insert a new line before closing brace.
- Use fully qualified import statements, i.e. do not use asterisks.
- Download the Weasis code style format
- In Window > Preferences > Java > Code Style > Formatter, click on Import and select the weasis-eclipse-formatting.xml file
- Press OK after importing
- Download the Weasis clean up code style
- In Window > Preferences > Java > Code Style > Clean Up , click on Import and select the weasis-eclipse-cleanup.xml file
- Press OK after importing
- Download the Weasis code templates
- In Window > Preferences > Java > Code Style > Code Templates , click on Import and select the weasis-code-style-template.xml file
- Press OK after importing
...
- Getting the Source
- For external Git client, see Building Weasis.
- From Eclipse Git perspective: Window > Open Perspective > GIT Repository Exploring. Click on button "Clone a GIT repository".
- In the New dialog, Add one of the following URIs:
- git://github.com/nroduit/Weasis.git (public repository)
- *https://weasis.repositoryhosting.com/git/weasis/weasis-dev.git* (read-write Git access for developers, enter your login)
- Press, Next and then Finnish
- Open File > Import...
In the New dialog, select Maven > Existing Maven Projects, click Next and select the "Weasis" or "weasis-dev" directory
Info title Not necessary to get all the Maven projects visible into Eclipse Deselect All and select only the plugins your are interested in (at least weasis-launcher and weasis-framework).
Connect imported Maven projects to GIT: Select all the projects, right click "Share Project...", select GIT. In Dialog, select "Use or create repository on in parent folder of project"
Info title Egit tutorial: httphttp://wiki.eclipse.org/EGit/User_Guide
- Building Weasis plug-ins
- Select the weasis-framework project (or the pom.xml in the project)
Right click, Run as > Maven Install (Compiling and installing all the plug-ins in the local Maven repository)
Info title Errors on the projects. Try the following instructions: - With m2e (from Eclipse 3.7), right click on the project and Maven > Update Project Configuration
- Right click on the project and select Refresh
- Project > Update All Maven Dependencies
- Project > Clean all projects
- Right click on the project and select Close Project and then Open Project
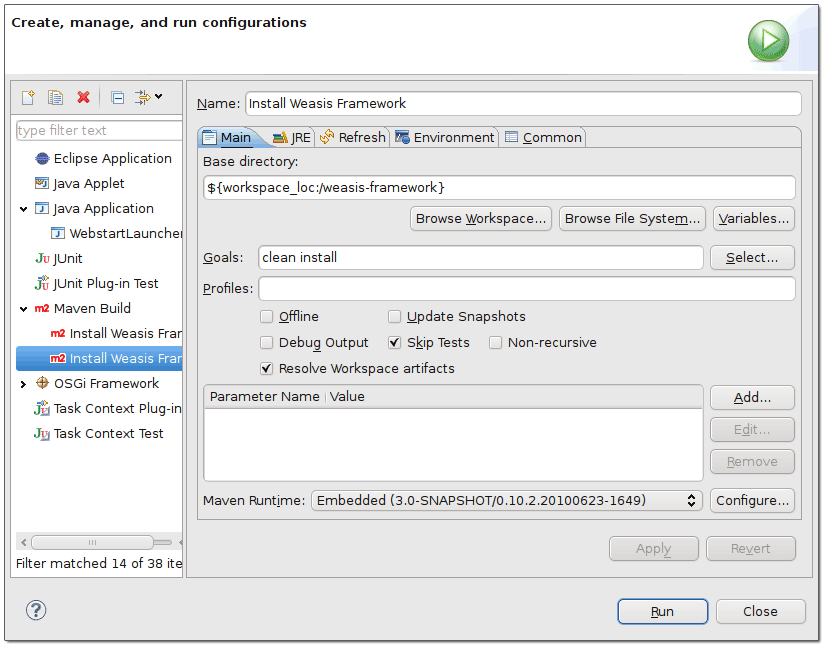
- Adding a custom Maven build entry in the Run As or Debug As menu
Note: in Eclipse, Maven commands in the "Run As" or "Debug As" menu are identical- Example for building Weasis
- Select the weasis-framework project
Right click, Run as > Run Configurations...
Info title Maven command line from a console If you have Maven installed on your system, it is sometimes easier to type your command in a console.
- Building Weasis Distributions
- Requires to install all the plug-ins (see Building Weasis plug-ins above)
- If weasis-distributions project is not in the Package Explorer list, import it:
- Open File > Import...
- In the Import dialog, select Maven > Existing Maven Projects, click Next
- Click on Browse and select the weasis-distributions folder (in yourWorkspace/weasis-framework)
- Press Select All and Finnish
- Select the weasis-distributions project
- Right click, Run as > Maven Package
- The distribution files are located in the target/dist folder of the project
...
- Open Run > Debug Configurations...
- Create a new Java Application
- In the Main tab, enter:
- Project: weasis-launcher
- Main Class: org.weasis.launcher.WeasisLauncher
- In the Arguments tab
Program arguments, examples for loading DICOM locally:
No Format $dicom:get -l "/home/user/Images/MRIX LUMBAR" "/home/user/Images/Dicom Test" $dicom:get -l "D:\\images\\dicom"VM arguments, minimal configuration:
No Format -Xms32m -Xmx512m -Dmaven.localRepository="your_path/.m2/repository" -Dgosh.args="-sc telnetd -p 17179 start"Info title maven.localRepository Replace your_path by your real path and use standard URL syntax ex : "C:/Documents%20and%20Settings/user/.m2/repository")
Other VM arguments
No Format -Dfelix.config.properties=file:conf/config.properties -Djava.ext.dirs=""Info title Meaning of the properties - felix.config.properties define the path of the OSGI configuration
- java.ext.dirs define the path of the external libraries of JRE. With an empty value, the libraries in the JRE ext folder are not loaded. Avoid having a conflict with JAI libraries if they are present in the JRE ext folder.