This page is intended for developers who want to contribute to Weasis and it is a recommendation for developers who want to create their own plug-ins, see also How to build and install a plug-in.
We highly recommend the use of Eclipse IDE, because all the following instructions are based on it and some settings and the coding conventions can be imported directly into Eclipse.
Prerequisites
- JDK 6 or higher
- Eclipse
- Git, Eclipse egit plugin, or use external Git client
- m2eclipse plug-in (Maven integration for Eclipse) - Included in Eclipse IDE for Java Developers 3.7 (Indigo)
Install Java and Eclipse
- JDK 6 or higher (Sun or OpenJDK)
Note: JRE is not suitable for m2eclipse - Eclipse IDE for Java Developers 3.7 (already includes Maven integration and swing designer) or Eclipse Classic (recommended 3.5.2, 3.6.2, 3.7 or e4)
Configure Eclipse
- You can edit the VM options of the eclipse.ini file in your eclipse folder. (-Xmx: the maximum memory for the JVM, Specifying the JVM location)
- Start Eclipse and select the path of the Weasis workspace Note: It is recommended to create a new Workspace for keeping a specific Weasis configuration.
- Go to Window > Preferences > Java > Installed JREs > Execution Environments and select the installed JDK for JavaSE-1.6
- In Window > Preferences > General > Workspace
- Select UTF-8 for Text file encoding
- Select Unix for New text file line delimiter
Code Style And Convention
Weasis adheres to Sun's Code Conventions for the Java Programming Language
- Maximum line length is 120 characters (this is a deviation from the Java standards).
- Use spaces instead of tabs.
- Indendation size is 4 spaces.
- Do not insert a new line before opening brace. Insert a new line before closing brace.
- Use fully qualified import statements, i.e. do not use asterisks.
- Download the Weasis code style format
- In Window > Preferences > Java > Code Style > Formatter, click on Import and select the weasis-eclipse-formatting.xml file
- Press OK after importing
- Download the Weasis clean up code style
- In Window > Preferences > Java > Code Style > Clean Up , click on Import and select the weasis-eclipse-cleanup.xml file
- Press OK after importing
- Download the Weasis code templates
- In Window > Preferences > Java > Code Style > Code Templates , click on Import and select the weasis-code-style-template.xml file
- Press OK after importing
Install egit and m2eclipse into Eclipse
Install the plug-ins into Eclipse
- Go to Help->Install New Software...
- Select in "work with" menu – All Available Sites –
- Select m2eclipse packages (Maven Integration for Eclipse) or m2e package from Eclipse 3.7
- Select egit
- Press Finish to install and validate security warning when prompted
Configure m2eclipse
m2eclipse provides comprehensive Maven integration for Eclipse. See http://maven.apache.org/guides/index.html
If you get the error message "Eclipse is running in a JRE, but a JDK is required" when starting Eclipse, you must specify the JDK 6 location in the eclipse.ini file.
- Maven has a settings file located in the Maven installation and/or user home directory that configure environmental specifics such as: HTTP proxy server, repository manager location, server authentication and passwords and other configuration properties.
If the setting file does not exist in the user home directory, copy it from the conf folder of the Maven distribution. The default user location user.home/.m2/settings.xml is recommended if you use also the common Maven distribution (see Building Weasis from command line). - Verify the Maven configuration of Eclipse in Window > Preferences > Maven > User Settings using the correct setting.xml file.
Getting the Source and Building Weasis From Eclipse
- Getting the Source
- For external Git client, see Building Weasis.
- From Eclipse Git perspective: Window > Open Perspective > GIT Repository Exploring. Click on button "Clone a GIT repository".
- In the New dialog, Add one of the following URIs:
- git://github.com/nroduit/Weasis.git (public repository)
- *https://weasis.repositoryhosting.com/git/weasis/weasis-dev.git* (read-write Git access for developers, enter your login)
- Press, Next and then Finnish
- Open File > Import...
In the New dialog, select Maven > Existing Maven Projects, click Next and select the "Weasis" or "weasis-dev" directory
Not necessary to get all the Maven projects visible into Eclipse
Deselect All and select only the plugins your are interested in (at least weasis-launcher and weasis-framework).
Connect imported Maven projects to GIT: Select all the projects, right click "Share Project...", select GIT. In Dialog, select "Use or create repository on in parent folder of project"
Egit tutorial: http://wiki.eclipse.org/EGit/User_Guide
- Building Weasis plug-ins
- Select the weasis-framework project (or the pom.xml in the project)
Right click, Run as > Maven Install (Compiling and installing all the plug-ins in the local Maven repository)
Errors on the projects. Try the following instructions:
- With m2e (from Eclipse 3.7), right click on the project and Maven > Update Project Configuration
- Right click on the project and select Refresh
- Project > Update All Maven Dependencies
- Project > Clean all projects
- Right click on the project and select Close Project and then Open Project
- Adding a custom Maven build entry in the Run As or Debug As menu
Note: in Eclipse, Maven commands in the "Run As" or "Debug As" menu are identical- Example for building Weasis
- Select the weasis-framework project
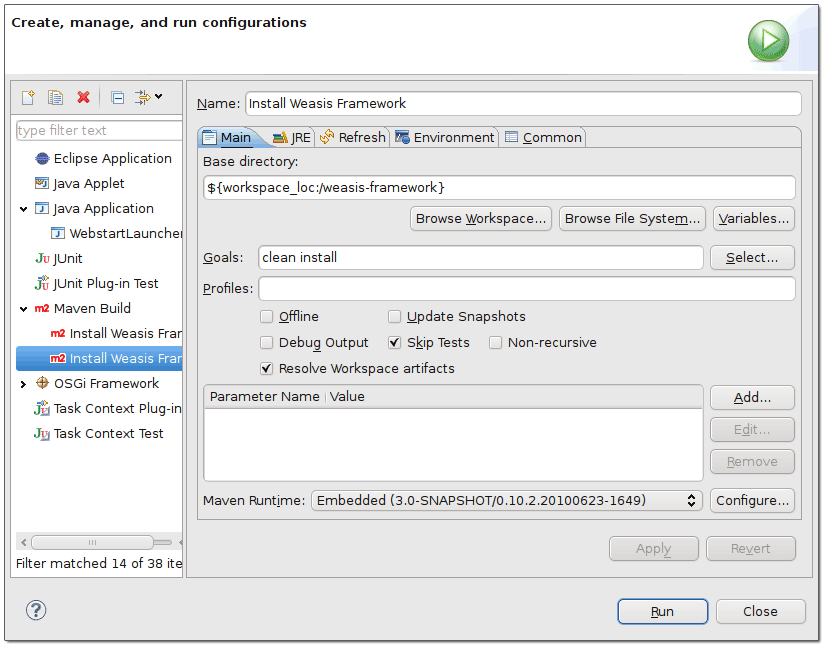
Right click, Run as > Run Configurations...
Maven command line from a console
If you have Maven installed on your system, it is sometimes easier to type your command in a console.
- Building Weasis Distributions
- Requires to install all the plug-ins (see Building Weasis plug-ins above)
- If weasis-distributions project is not in the Package Explorer list, import it:
- Open File > Import...
- In the Import dialog, select Maven > Existing Maven Projects, click Next
- Click on Browse and select the weasis-distributions folder (in yourWorkspace/weasis-framework)
- Press Select All and Finnish
- Select the weasis-distributions project
- Right click, Run as > Maven Package
- The distribution files are located in the target/dist folder of the project
Debug or Run from Eclipse
For debugging Weasis, you need to create a Debug configuration:
- Open Run > Debug Configurations...
- Create a new Java Application
- In the Main tab, enter:
- Project: weasis-launcher
- Main Class: org.weasis.launcher.WeasisLauncher
- In the Arguments tab
Program arguments, examples for loading DICOM locally:
$dicom:get -l "/home/user/Images/MRIX LUMBAR" "/home/user/Images/Dicom Test"
$dicom:get -l "D:\\images\\dicom"
VM arguments, minimal configuration:
-Xms32m -Xmx512m -Dmaven.localRepository="your_path/.m2/repository" -Dgosh.args="-sc telnetd -p 17179 start"
maven.localRepository
Replace your_path by your real path and use standard URL syntax ex : "C:/Documents%20and%20Settings/user/.m2/repository")
Other VM arguments
-Dfelix.config.properties=file:conf/config.properties
-Djava.ext.dirs=""
Meaning of the properties
- felix.config.properties define the path of the OSGI configuration
- java.ext.dirs define the path of the external libraries of JRE. With an empty value, the libraries in the JRE ext folder are not loaded. Avoid having a conflict with JAI libraries if they are present in the JRE ext folder.