This page describes how to install Weasis.
Weasis is launched from the dcm4chee administrative web interface, as shown in the pictures below. It may also be copied to a CD (or other removable device) with images.
|
|
|
|
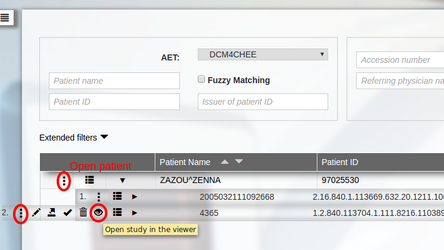
Weasis in dcm4chee-arc-light
|
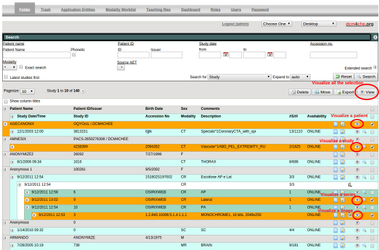
Weasis in dcm4chee-web3
|
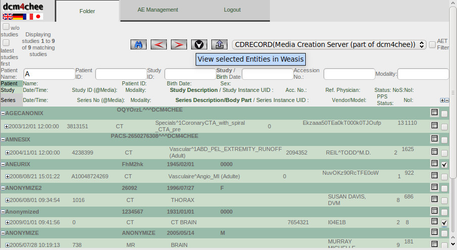
dcm4chee-web
|
For dcm4chee-arc-light
- Install dcm4chee, if not already done.
- Go here and download these Weasis files.
- From the folder with the latest version number:
- weasis.war
- weasis-i18n.war (Optional for internationalization)
- From weasis-pacs-connector folder:
weasis-pacs-connector.war
Download issue
Some browsers (Internet Explorer) may rename war files to zip. If so, use the Save As option when downloading. Change the name back to war.
- From the folder with the latest version number:
- Open the management console in http://localhost:9990/
- Select the “Deployments” tab
- Add the .war files using the “Add” button (Choose Upload a new deployment)
- Configure Weasis (Required to change WADO configuration)
The default configuration of Weasis is stored in two files inside weasis.war.
To override the default configuration:Go here.
Requires weasis-pacs-connector 6.x and superior: Download the current weasis-connector-default.properties and rename it weasis-pacs-connector.properties, and download dicom-dcm4chee.properties (configuration of the dcm4chee archive)
Download issue
From github interface, click on "raw" button for downloading the file with the "save as..." menu of the browser.
- Copy the files into wildfly/standalone/configuration (the application uses "jboss.server.config.dir" to locate files).
- Edit the configuration as needed.
As the current configuration of dicom-dcm4chee.properties is defined for dcm4chee-web3, it is necessary to modify the WADO property by: arc.wado.url=${server.base.url}/dcm4chee-arc/aets/DCM4CHEE/wado
For example, dcm4chee may be running on a different computer than Weasis, or the AE Title of dcm4chee may have been changed. If so, edit weasis-pacs-connector.properties or dicom-dcm4chee.properties (Change pacs.host, pacs.port, and pacs.aet). - To add new properties or arguments in the JNLP file, see configuration of weasis-pacs-connector
- To activate Weasis in dcm4chee-arc-light user interface, you need need to import 2 attributes in the LDAP configuration
From a LDAP manager (like Apache Directory Studio)
- Connect with the dcm4chee configuration
Import weasis.ldif
weasis-pacs-connector configuration
The weasis.ldif configuration is suitable for the default relative path (when weasis-pacs-connector is installed in the same JBoss as dcm4chee)
Otherwise edit weasis.ldif file and change the relative URL by an absolute value, ex: http://myserver.com:8087/weasis-pacs-connector
- Restart all the components (ex. docker restart postgres slapd dcm4chee-arc)
Refresh the web page and the view button should appears as in the screenshot above
For dcm4chee-web3
- Install dcm4chee, if not already done.
- dcm4chee-web3 is not compatible with versions of dcm4chee before 2.16.0
- dcm4chee 2.16.0 to 2.17.0 are compatible with dcm4chee-web3, but the older dcm4chee-web is installed by default.
For dcm4chee 2.17.1+, dcm4chee-web3 is already installed.
To check if it is the latest version, start dcm4chee-web3 (http://localhost:8080/dcm4chee-web3/), log in, and mouse over the dcm4chee.org icon in the upper right corner.
- Go here and download these Weasis files.
- From the folder with the latest version number:
- weasis.war
- weasis-i18n.war - Optional for internationalization (translation)
- From weasis-pacs-connector folder:
- dcm4chee-web-weasis.jar
weasis-pacs-connector.war
Download issue
Some browsers (Internet Explorer) may rename war files to zip. If so, use the Save As option when downloading. Change the name back to war.
- From the folder with the latest version number:
- Place these files in the dcm4chee deploy folder (server/default/deploy/).
- To activate Weasis, go to the JMX console (at http://localhost:8080/jmx-console)
In dcm4chee.web select service=WebConfig and set these two values:
WebviewerNames = weasis
WebviewerBaseUrl = NONE
From weasis-pacs-connector 5.0 WebviewerBaseUrl can have different values:
- Launch Weasis as an external application (default value when NONE): WebviewerBaseUrl = weasis:/weasis-pacs-connector/viewer
- Launch Weasis as an Applet in the web browser (not recommended as several browsers block Java plugin) : WebviewerBaseUrl = weasis:/weasis-pacs-connector/viewer-applet
- Click the Apply Changes button
- Configure Weasis (This step is optional if you just want to keep the default configuration. It is required when the AE Title DCM4CHEE has been changed)
The default configuration of Weasis is stored in two files inside weasis.war.
To override the default configuration:Go here.
weasis-pacs-connector 4.x and 5.x: Download weasis-connector-default.properties and rename it weasis-pacs-connector.propertiesweasis-pacs-connector 6.x and superior: Download the current weasis-connector-default.properties and rename it weasis-pacs-connector.properties, and download dicom-dcm4chee.properties (configuration of the dcm4chee archive)
Download issue
From github interface, click on "raw" button for downloading the file with the "save as..." menu of the browser.
- Copy the files into a folder in the classpath of the servlet container. In JBoss (inferior to version 7), the best location would typically be server/default/conf.
- Edit the configuration as needed.
For example, dcm4chee may be running on a different computer than Weasis, or the AE Title of dcm4chee may have been changed.
If so, edit weasis-pacs-connector.properties or dicom-dcm4chee.properties for weasis-pacs-connector 6.x. Change pacs.host, pacs.port, and pacs.aet. - To add new properties or arguments in the JNLP file, see configuration of weasis-pacs-connector
That's all, now restart dcm4chee and launch Weasis from the dcm4chee-web3 portal.
For dcm4chee-web (old web interface - before 2.17.1)
- Download at http://sourceforge.net/projects/dcm4che/files/Weasis/
- The last Weasis version: weasis.war
- The Weasis internationalization (translation): weasis-i18n.war (optional)
The modified dcm4chee web interface (dcm4chee-web/version/dcm4chee-web.war)
dcm4chee version
dcm4chee-web.war has been built only for some dcm4chee versions. For other versions see Rebuild dcm4chee-web from any version)
- Place these three files into the deploy folder (server/default/deploy/) of dcm4chee.
- Modify the permission in /dcm4jboss-web/src/etc/conf/dcm4chee-web/folder.permissions or in server/default/conf/dcm4chee-web if dcm4chee is already installed
folder.*=edit,move,delete,view,*export,edit.newStudyUID,mergepat,study_permission,study_permission.free_role_action,query_has_issuer folder.*export=export_tf,export_xds
...
folder=WebUser(send,view);DatacareUser(edit,move,delete,export_xds,view);WebAdmin(*)
That's all, now restart dcm4chee and launch Weasis from the web portal.
Write weasis-portable to DICOM CDs with dcm4chee-cdw
- Install dcm4chee-cdw (see doc/INSTALL.txt in the archive)
- Extract weasis-portable.zip into the ../dcm4chee/server/default/data/mergedir directory
- Go to the dcm4che jmx console (dcm4chee.cdw):
- Select the MediaCreationMgtSCP item and set to true the value of DefaultIncludeDisplayApplication
- Select the MakeIsoImage item and set to 4 the value of isoLevel
Click on the Apply Changes button
Embedding a Java Runtime for Windows
The executable (weasis-win32.exe) allows to embed a JRE in the directory "jre/windows" (weasis-portable/jre/windows/bin/java.exe). The embedded Java Runtime is used only when no runtime is available on the system. When Java is run from CD, it could be a little slow.